Show Comment Box Below The Blog Post.
One of the problem blogger have is that Blogger don't have a embedded comment form like wordpress. After a longtime , now blogger draft has found a trick to include comment form. It's really an easy hack for those who use templates provided by blogger. For those who use customized template need to include a HTML code to make the comment form appear below each post.
Let see how to do this :
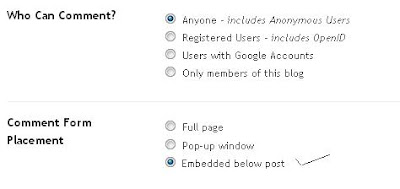
Step 1 : First login to draft.blogger.com with your google account . Then in blogger dashboard click settings then comments. There you will find three options like this

As shown above check comment form placement : Embedded below post.
Step 1 is enough for users who use uncustomized blogger template. For them after doing this the comment form will be included below the post. Other users need to do the second step to make the comment form appear below post.
Step 2 :
Now go to Edit HTML section and first take a backup copy of your template. Then check expand widgets and search the folowing code
<p class='comment-footer'> <b:if cond='data:post.allowComments'> <a expr:href='data:post.addCommentUrl' expr:onclick='data:post.addCommentOnclick'><data:postCommentMsg/></a> </b:if> </p>
Now replace the above code with this following code
<p class='comment-footer'> <b:if cond='data:post.embedCommentForm'> <b:include data='post' name='comment-form'/> <b:else/> <b:if cond='data:post.allowComments'> <a expr:href='data:post.addCommentUrl' expr:onclick='data:post.addCommentOnclick'><data:postCommentMsg/></a> </b:if> </b:if> </p>
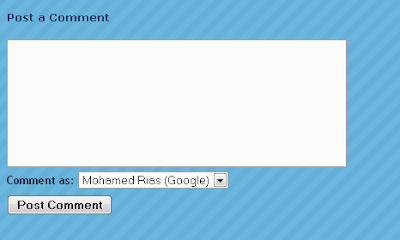
that's it save your template. Now you can see a beautiful comment form embedded below each post.
Screenshot :

Troubleshooting :
Do this step only if the comment form don't appear after step 2. In some templates even after adding this code the comment form will not appear. Thanks to Blogger Buster for this hack . Now search for <b:include data='post' name='comments' /> and add the following code immediately below it <b:include data='post' name='comment-form'/> .
After adding this code all templates will have comment form embedded below post . It's really one of the best hack which draft blogger has now made it available for all blogger users. Before this most visitors might have felt uneasy to comment , because to write comments we need to navigate from the page or a pop-up window will open . But now writing comments is made very easy.
Anything else we can do with the comment form ?
Yes , we can change the width and height of comment form .
to change the width and height of comment form just change the following code in green .
<b:includable id='comment-form' var='post'>
<div class='comment-form'>
<a name='comment-form'/>
<h3><data:postCommentMsg/></h3>
<p><data:blogCommentMessage/></p>
<iframe allowtransparency='true' expr:src='data:post.commentFormIframeSrc' frameborder='0' height='275' id='comment-editor' scrolling='auto' width='100%'/>
</div>
</b:includable>
Why are you waiting for , write a comment on this post and let me know how much you liked this post .
Let see how to do this :
Step 1 : First login to draft.blogger.com with your google account . Then in blogger dashboard click settings then comments. There you will find three options like this

As shown above check comment form placement : Embedded below post.
Step 1 is enough for users who use uncustomized blogger template. For them after doing this the comment form will be included below the post. Other users need to do the second step to make the comment form appear below post.
Step 2 :
Now go to Edit HTML section and first take a backup copy of your template. Then check expand widgets and search the folowing code
<p class='comment-footer'> <b:if cond='data:post.allowComments'> <a expr:href='data:post.addCommentUrl' expr:onclick='data:post.addCommentOnclick'><data:postCommentMsg/></a> </b:if> </p>
Now replace the above code with this following code
<p class='comment-footer'> <b:if cond='data:post.embedCommentForm'> <b:include data='post' name='comment-form'/> <b:else/> <b:if cond='data:post.allowComments'> <a expr:href='data:post.addCommentUrl' expr:onclick='data:post.addCommentOnclick'><data:postCommentMsg/></a> </b:if> </b:if> </p>
that's it save your template. Now you can see a beautiful comment form embedded below each post.
Screenshot :

Troubleshooting :
Do this step only if the comment form don't appear after step 2. In some templates even after adding this code the comment form will not appear. Thanks to Blogger Buster for this hack . Now search for <b:include data='post' name='comments' /> and add the following code immediately below it <b:include data='post' name='comment-form'/> .
After adding this code all templates will have comment form embedded below post . It's really one of the best hack which draft blogger has now made it available for all blogger users. Before this most visitors might have felt uneasy to comment , because to write comments we need to navigate from the page or a pop-up window will open . But now writing comments is made very easy.
Anything else we can do with the comment form ?
Yes , we can change the width and height of comment form .
to change the width and height of comment form just change the following code in green .
<b:includable id='comment-form' var='post'>
<div class='comment-form'>
<a name='comment-form'/>
<h3><data:postCommentMsg/></h3>
<p><data:blogCommentMessage/></p>
<iframe allowtransparency='true' expr:src='data:post.commentFormIframeSrc' frameborder='0' height='275' id='comment-editor' scrolling='auto' width='100%'/>
</div>
</b:includable>
Why are you waiting for , write a comment on this post and let me know how much you liked this post .
18 comments:
Every site have their own different features and they need to be taken care of if they are not been utilized after its usage by the different user of the site.
For those who use customized template need to include a HTML code to make the comment form appear below each post.
Thank you for sharing this information, hope you can often see after the information, get more people to useful things, continue to...
Thank you for sharing, you're right, you're just for me is very useful. I really like your post.
This is a great news,which has a lot of readers.
Such kind of post giving us various knowaledge,it worthy to read.It is so wonderful.
How good it is! It's very useful information! From the article i learn more things,thank you!
so after applying this hack to your blog, you’ll make it easier for you and your listener.
you’ll read the new comments easily and blogspot visitors’ll add new comments easily too.
Is a very good blog
I will always look at your article
I hope you write a good future
Thank you for sharing
This is a communication platform, thank everybody to share your information here.I greatly benefit from your articles every time I read one.Thank you for your sharing,your post let me know a lot of information and knowledge.
It's very useful information! A lot of people like your blog.
Nice post. Hopefully you would share more good info about fat loss in the future too.
they need to be taken care of if they are not been utilized after its usage by the different user of the site.Thank you for sharing this information.
I like read blogs, blog gave me a lot of information, thank you, I have remembered to share your these steps
It's really an easy hack for those who use templates provided by blogger. For those who use customized template need to include a HTML code to make the comment form appear below each post.
Any blogger does not want any meaningless or useless comments. Over ere you have write really a great stuff about the getting more comments belove our blog post.
Thanks for the information about creating the comment box. Creating a friendly landing platform is so important for creating good impressions.
Your diet is extremely critical in the fight against gout.
I just read through this posting and had to express gratitude personally. Very clear and succinct!
Post a Comment